> ## Documentation Index
> Fetch the complete documentation index at: https://wb-21fd5541-docs-sandboxes-integrations-placement.mintlify.site/llms.txt
> Use this file to discover all available pages before exploring further.
# artifact 버전을 컬렉션에 연결하기
> 조직 전체에서 공유할 수 있도록 W&B Registry의 컬렉션에 artifact 버전을 연결합니다.
artifact 버전을 조직에서 사용할 수 있게 하려면 W\&B Registry의 [컬렉션](/ko/models/registry/create_collection)에 *연결*하세요.
연결하면 버전이 [비공개 프로젝트 수준 범위에서 공유 조직 수준 범위로](/ko/models/registry/create_registry#visibility-types) 이동합니다. artifact 버전은 [W\&B Python SDK를 사용해 프로그래밍 방식으로 연결하거나 W\&B App에서 대화형으로 연결할 수 있습니다](/ko/models/registry/link_version#link-an-artifact-to-a-collection).
artifact를 연결하면 W\&B는 소스 artifact와 컬렉션 항목 사이에 레퍼런스를 생성합니다. 연결된 버전은 프로젝트 내 run에 로깅된 소스 artifact 버전을 가리킵니다. 컬렉션의 연결된 버전과 해당 버전이 로깅된 프로젝트의 소스 버전을 모두 볼 수 있습니다.
## artifact를 컬렉션에 연결하기
사용 사례에 따라 아래 탭의 안내에 따라 artifact 버전을 연결하세요.
시작하기 전에 다음 사항을 확인하세요:
* 컬렉션에서 허용하는 artifact 유형. 컬렉션 유형에 대한 자세한 내용은 [컬렉션 만들기](./create_collection)의 "컬렉션 유형"을 참조하세요.
* 컬렉션이 속한 레지스트리가 이미 존재하는지 확인하세요. 레지스트리가 존재하는지 확인하려면 [Registry App로 이동하여](/ko/models/registry/search_registry) 레지스트리 이름을 검색하세요.
{/*
Watch a [video demonstrating linking a version](https://www.youtube.com/watch?v=2i_n1ExgO0A) (8 min).
*/}
[`wandb.Run.link_artifact()`](/ko/models/ref/python/experiments/run#link_artifact) 또는
[`wandb.Artifact.link()`](/ko/models/ref/python/experiments/artifact#method-artifactlink)를 사용하여 프로그래밍 방식으로 아티팩트 버전을 컬렉션에 연결합니다.
Use `wandb.Run.link_artifact()` to link an artifact version [within the context of a run](#link-an-artifact-version-within-the-context-of-a-run). Use `wandb.Artifact.link()` to link an *existing artifact version* [outside the context of a run](#link-an-artifact-version-outside-the-context-of-a-run).
{/*
`wandb.Artifact.link()` does not require you to initialize a run with `wandb.init()`. `wandb.Run.link_artifact()` requires you to initialize a run with `wandb.init()`.
*/}
For both approaches, specify the name of the artifact (`wandb.Artifact(name=""`), the type of artifact (`wandb.Artifact(type=""`), and the `target_path` (`wandb.Artifact(target_path=""`)) of the collection and registry you want to link the artifact version to.
대상 경로는 접두사 `"wandb-registry"`, 레지스트리 이름, 컬렉션 이름을 슬래시(`/`)로 구분하여 구성됩니다:
{/* Use the `target_path` parameter to specify the collection and registry you want to link the artifact version to. The target path consists of the prefix "wandb-registry", the name of the registry, and the name of the collection separated by a forward slashes: */}
```text theme={null}
wandb-registry-{REGISTRY_NAME}/{COLLECTION_NAME}
```
### run 컨텍스트 내에서 artifact 버전 연결하기
`wandb.Run.link_artifact()`를 사용하여 run 컨텍스트 내에서 아티팩트 버전을 연결합니다. 이를 위해 먼저 `wandb.init()`으로 run을 초기화합니다. 다음으로 아티팩트 객체를 생성하고 파일을 추가합니다. 마지막으로 `wandb.Run.link_artifact()` 메서드를 사용하여 아티팩트 버전을 컬렉션에 연결합니다.
이 방법을 사용하면 W\&B 프로젝트에 run이 생성됩니다. 아티팩트 버전은 컬렉션에 연결되며 해당 run과 연결됩니다.
아래 코드 스니펫을 복사하여 붙여넣으세요. `<>`로 묶인 값을 실제 값으로 교체하세요:
```python theme={null}
import wandb
entity = "" # 팀 엔티티
project = "" # 아티팩트가 포함된 프로젝트 이름
# run 초기화
with wandb.init(entity = entity, project = project) as run:
# 아티팩트 객체 생성
# type 파라미터는 아티팩트 객체의 유형과
# 컬렉션 유형을 모두 지정합니다
artifact = wandb.Artifact(name = "", type = "")
# 아티팩트 객체에 파일을 추가합니다.
# 로컬 머신의 파일 경로를 지정하세요.
artifact.add_file(local_path = "")
# 아티팩트를 연결할 컬렉션과 레지스트리를 지정합니다
REGISTRY_NAME = ""
COLLECTION_NAME = ""
target_path=f"wandb-registry-{REGISTRY_NAME}/{COLLECTION_NAME}"
# 아티팩트를 컬렉션에 연결합니다
run.link_artifact(artifact = artifact, target_path = target_path)
```
### run 컨텍스트 외부에서 artifact 버전 연결하기
Use `wandb.Artifact.link()` to link an existing artifact version outside the context of a run. With this approach,
you do not need to initialize a run with `wandb.init()`. This means that a run is not created in your W\&B project. In other
words, the artifact version is linked to the collection without being associated with a run.
먼저 아티팩트 객체를 생성하고 파일을 추가합니다. 그런 다음 `wandb.Artifact.link()` 메서드를 사용하여 아티팩트 버전을 컬렉션에 연결합니다.
아래 코드 스니펫을 복사하여 붙여넣으세요. `<>`로 묶인 값을 실제 값으로 교체하세요:
```python theme={null}
import wandb
# 아티팩트 객체 생성
# type 파라미터는 아티팩트 객체의 유형과
# 컬렉션 유형을 모두 지정합니다
artifact = wandb.Artifact(name = "", type = "")
# 아티팩트 객체에 파일을 추가합니다.
# 로컬 머신의 파일 경로를 지정하세요.
artifact.add_file(local_path = "")
# 아티팩트를 연결할 컬렉션과 레지스트리를 지정합니다
REGISTRY_NAME = ""
COLLECTION_NAME = ""
target_path=f"wandb-registry-{REGISTRY_NAME}/{COLLECTION_NAME}"
# 아티팩트를 컬렉션에 연결합니다
artifact.link(target_path = target_path)
```
1. W\&B Registry로 이동합니다.
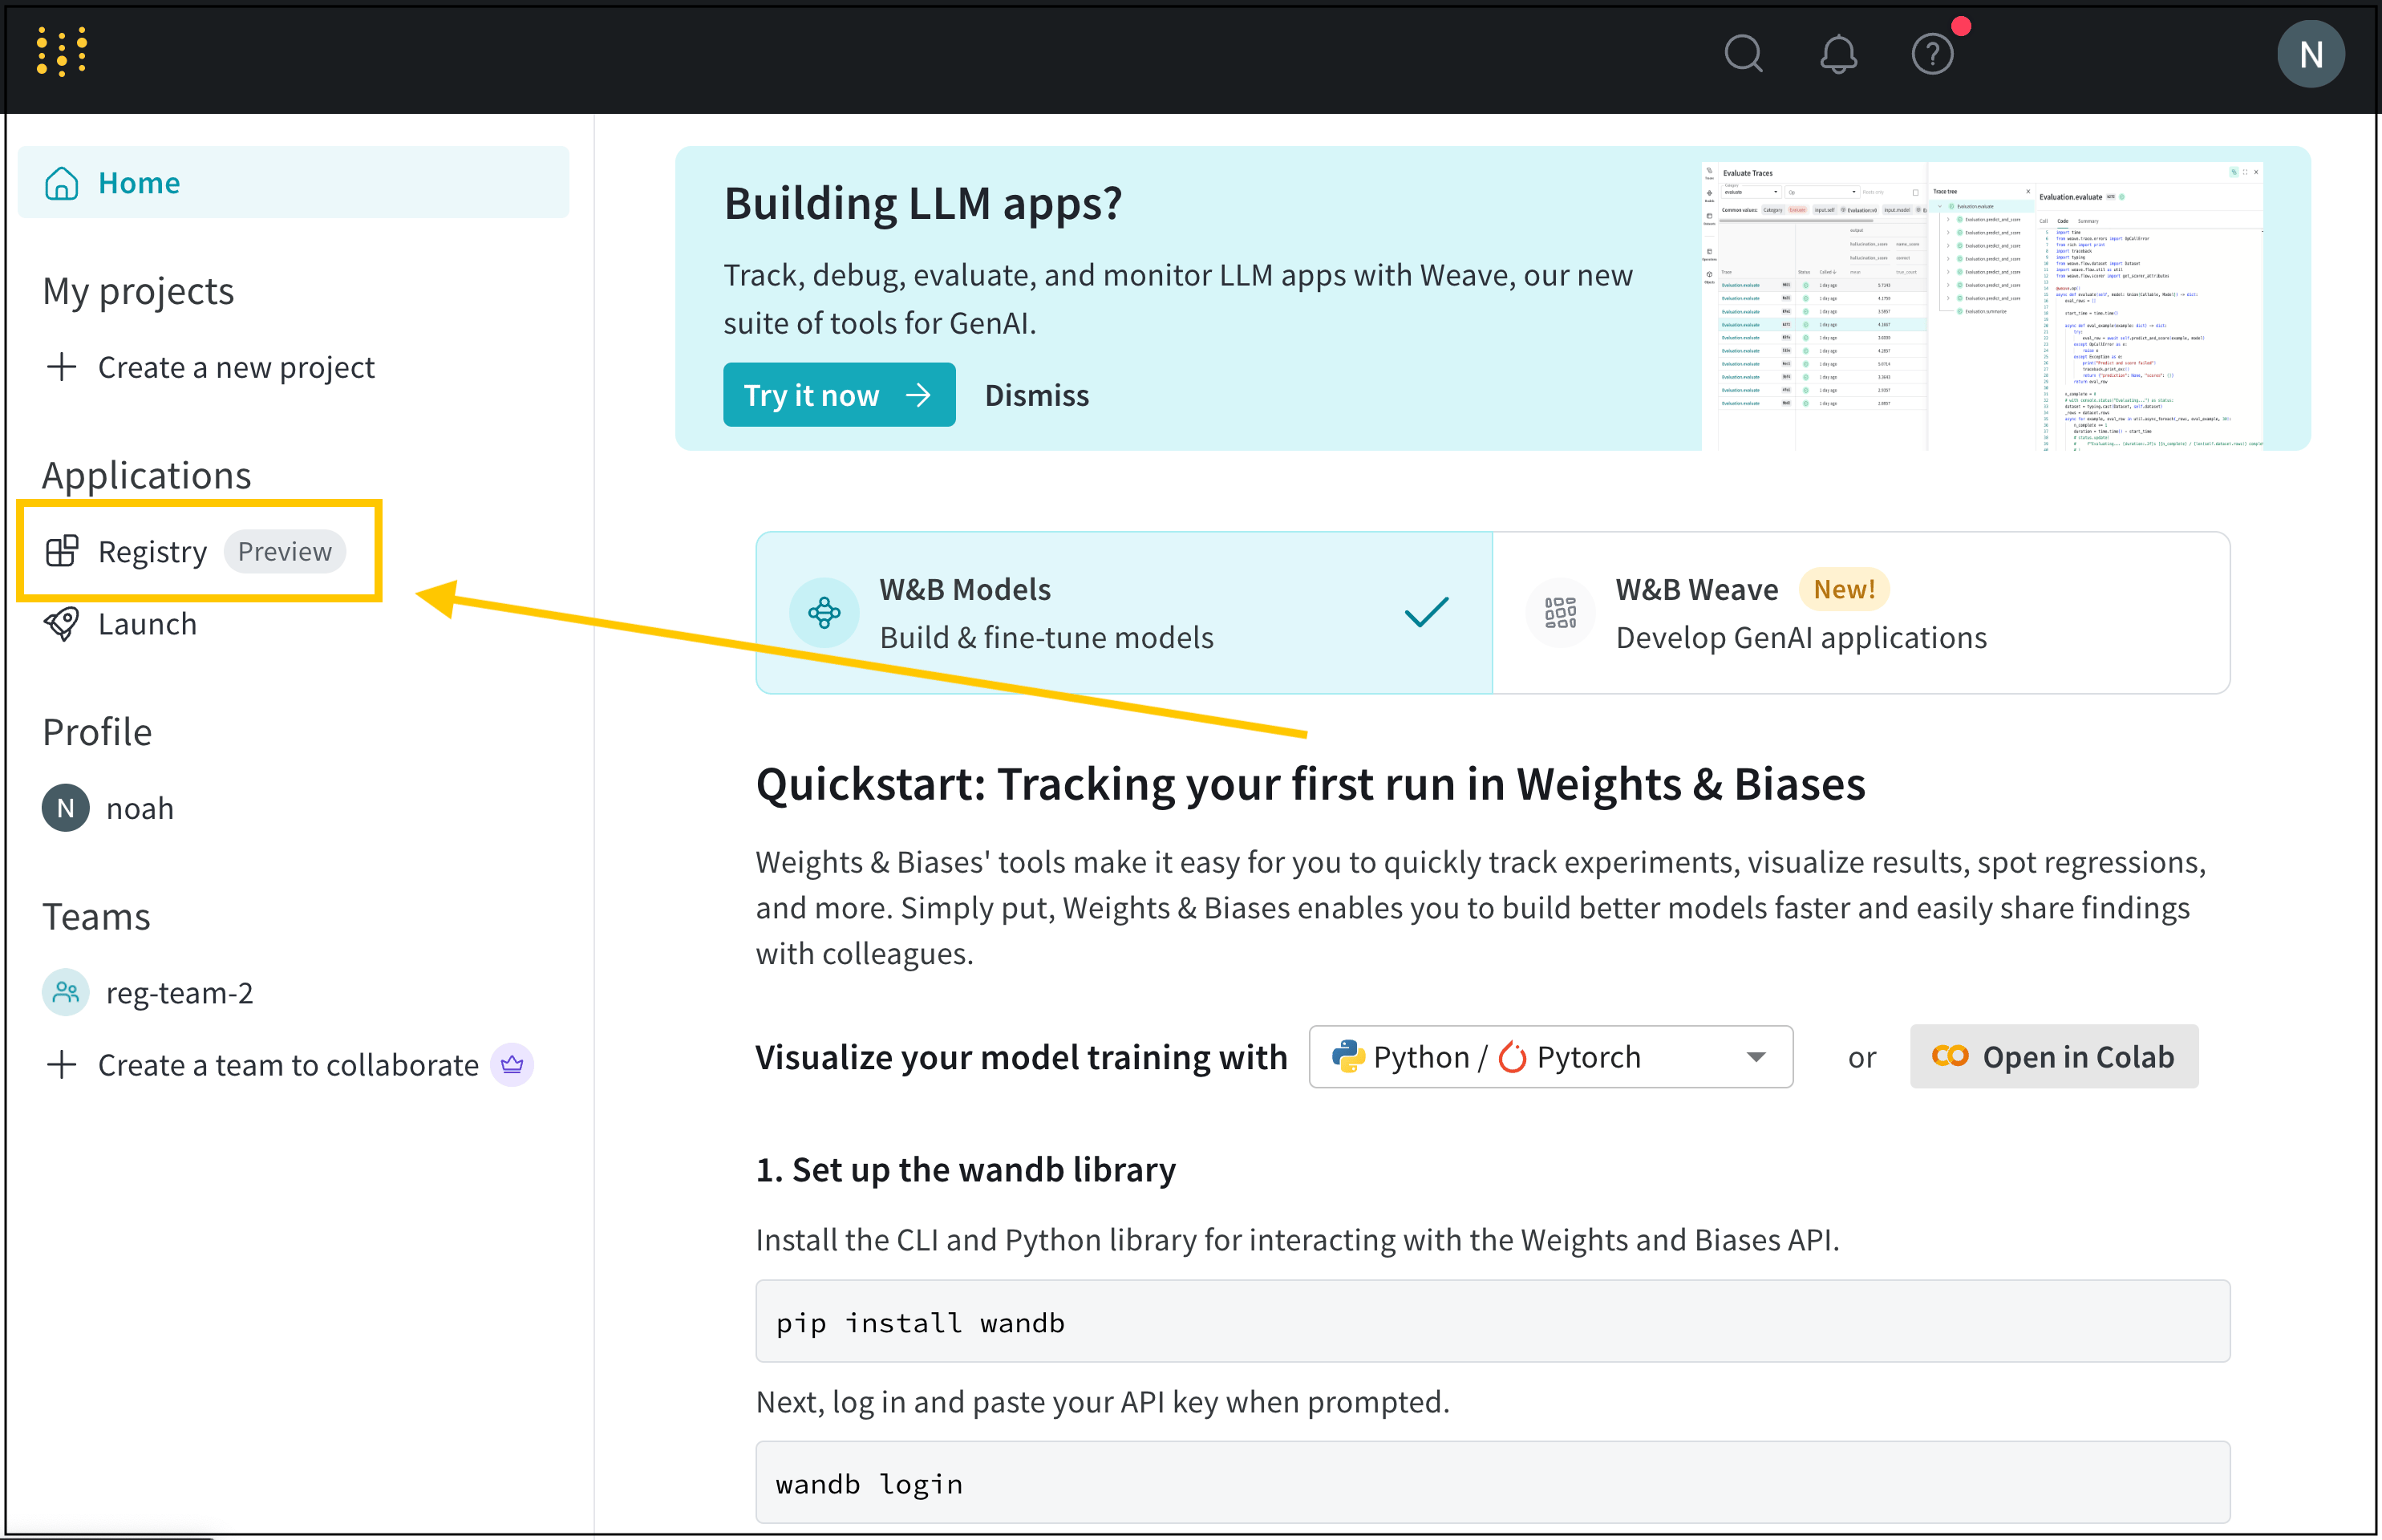 2. artifact 버전을 연결할 collection 이름 옆에 마우스를 올립니다.
3. **View details** 옆의 **액션 ()** 메뉴를 선택합니다.
4. 드롭다운에서 **Link new version**을 선택합니다.
5. 나타나는 사이드바에서 **Team** 드롭다운으로 팀 이름을 선택합니다.
6. **Project** 드롭다운에서 artifact가 있는 프로젝트 이름을 선택합니다.
7. **Artifact** 드롭다운에서 artifact 이름을 선택합니다.
8. **Version** 드롭다운에서 collection에 연결할 artifact 버전을 선택합니다.
{/* TO DO GIF 삽입 */}
1. W\&B App에서 프로젝트의 artifact 브라우저로 이동합니다: `https://wandb.ai///artifacts`
2. 프로젝트 사이드바에서 Artifacts 아이콘을 선택합니다.
3. 레지스트리에 연결할 artifact 버전을 클릭합니다.
4. **Version overview** 섹션에서 **Link to registry** 버튼을 클릭합니다.
5. 화면 오른쪽에 나타나는 모달에서 **Select a register model** 드롭다운 메뉴에서 artifact를 선택합니다.
6. **Next step**을 클릭합니다.
7. (선택 사항) **Aliases** 드롭다운에서 alias를 선택합니다.
8. **Link to registry**를 클릭합니다.
{/* 이 GIF를 업데이트 */}
{/*
2. artifact 버전을 연결할 collection 이름 옆에 마우스를 올립니다.
3. **View details** 옆의 **액션 ()** 메뉴를 선택합니다.
4. 드롭다운에서 **Link new version**을 선택합니다.
5. 나타나는 사이드바에서 **Team** 드롭다운으로 팀 이름을 선택합니다.
6. **Project** 드롭다운에서 artifact가 있는 프로젝트 이름을 선택합니다.
7. **Artifact** 드롭다운에서 artifact 이름을 선택합니다.
8. **Version** 드롭다운에서 collection에 연결할 artifact 버전을 선택합니다.
{/* TO DO GIF 삽입 */}
1. W\&B App에서 프로젝트의 artifact 브라우저로 이동합니다: `https://wandb.ai///artifacts`
2. 프로젝트 사이드바에서 Artifacts 아이콘을 선택합니다.
3. 레지스트리에 연결할 artifact 버전을 클릭합니다.
4. **Version overview** 섹션에서 **Link to registry** 버튼을 클릭합니다.
5. 화면 오른쪽에 나타나는 모달에서 **Select a register model** 드롭다운 메뉴에서 artifact를 선택합니다.
6. **Next step**을 클릭합니다.
7. (선택 사항) **Aliases** 드롭다운에서 alias를 선택합니다.
8. **Link to registry**를 클릭합니다.
{/* 이 GIF를 업데이트 */}
{/*
 */}
Registry App에서 [연결된 artifact의 메타데이터, 버전 데이터, 사용 정보, 리니지 정보 보기](/ko/models/registry/link_version#view-linked-artifacts-in-a-registry") 등을 확인할 수 있습니다.
*/}
Registry App에서 [연결된 artifact의 메타데이터, 버전 데이터, 사용 정보, 리니지 정보 보기](/ko/models/registry/link_version#view-linked-artifacts-in-a-registry") 등을 확인할 수 있습니다.
## 레지스트리에서 연결된 artifact 보기
W\&B 레지스트리에서 메타데이터, 리니지, 사용 정보 등 연결된 artifact에 대한 정보를 확인합니다.
1. W\&B 레지스트리로 이동합니다.
2. artifact를 연결한 레지스트리의 이름을 선택합니다.
3. collection 이름을 선택합니다.
4. collection의 artifact가 메트릭을 로깅하는 경우 **메트릭 표시**를 클릭해 버전 간 메트릭을 비교합니다.
5. artifact 버전 목록에서 액세스하려는 버전을 선택합니다. 버전 번호는 `v0`부터 시작해 연결된 각 artifact 버전에 순차적으로 할당됩니다.
6. artifact 버전의 세부 정보를 보려면 해당 버전을 클릭합니다. 이 페이지의 탭에서 해당 버전의 메타데이터(로깅된 메트릭 포함), 리니지, 사용 정보를 확인할 수 있습니다.
**Version** 탭의 **Full Name** 필드를 확인하세요. 연결된 artifact의 전체 이름은 레지스트리, collection 이름, 그리고 artifact 버전의 alias 또는 인덱스로 구성됩니다.
```text title="Full name of a linked artifact" theme={null}
wandb-registry-{REGISTRY_NAME}/{COLLECTION_NAME}:v{INTEGER}
```
코드로 artifact 버전에 액세스하려면 연결된 artifact의 전체 이름이 필요합니다.
## 문제 해결
artifact를 연결할 수 없는 경우 아래의 일반적인 항목을 다시 확인하세요.
### 개인 계정에서 artifact 로깅
개인 entity로 W\&B에 로깅한 artifact는 레지스트리에 연결할 수 없습니다. 조직 내 팀 entity를 사용해 artifact를 로깅해야 합니다. 조직의 팀 내에서 로깅한 artifact만 조직의 레지스트리에 연결할 수 있습니다.
artifact를 레지스트리에 연결하려면 팀 entity로 해당 artifact를 로깅해야 합니다.
#### 팀 entity 찾기
W\&B에서는 팀 이름을 해당 팀의 entity로 사용합니다. 예를 들어 팀 이름이 **team-awesome**라면 팀 entity는 `team-awesome`입니다.
다음과 같은 방법으로 팀 이름을 확인할 수 있습니다:
1. 팀의 W\&B 프로필 페이지로 이동합니다.
2. 사이트 URL을 복사합니다. URL 형식은 `https://wandb.ai/`입니다. 여기서 ``은 팀 이름이면서 동시에 팀의 entity입니다.
#### 팀 entity에서 로깅하기
1. [`wandb.init()`](/ko/models/ref/python/functions/init)으로 run을 초기화할 때 entity로 팀을 지정하세요. run을 초기화할 때 `entity`를 지정하지 않으면 기본 entity가 사용되며, 이 entity는 팀 entity일 수도 있고 아닐 수도 있습니다.
```python theme={null}
import wandb
with wandb.init(entity='', project='') as run:
# 여기에 아티팩트를 로깅하세요
```
2. `wandb.Run.log_artifact()`를 사용하거나 Artifact 객체를 만든 다음 파일을 추가하는 방식으로 아티팩트를 run에 로깅합니다.
```python theme={null}
artifact = wandb.Artifact(name="", type="")
```
아티팩트를 로깅하는 방법은 [아티팩트 구성](/ko/models/artifacts/construct-an-artifact/)을 참조하세요.
3. 아티팩트가 개인 entity에 로깅된 경우, 조직 내 entity에 다시 로깅해야 합니다.
### W\&B App UI에서 레지스트리 경로 확인
W\&B App UI에서 레지스트리의 경로를 확인하려면 빈 컬렉션을 만드세요. 이렇게 하려면 아래 단계를 따르세요:
1. [https://wandb.ai/registry/](https://wandb.ai/registry/)에서 W\&B 레지스트리로 이동합니다.
2. 아티팩트를 연결할 레지스트리를 클릭합니다.
3. 빈 컬렉션을 클릭합니다. 빈 컬렉션이 없으면 새 컬렉션을 만듭니다.
4. 표시되는 코드 스니펫에서 `.link_artifact()`의 `target_path` 필드를 확인합니다.
5. (선택) 컬렉션을 삭제합니다.
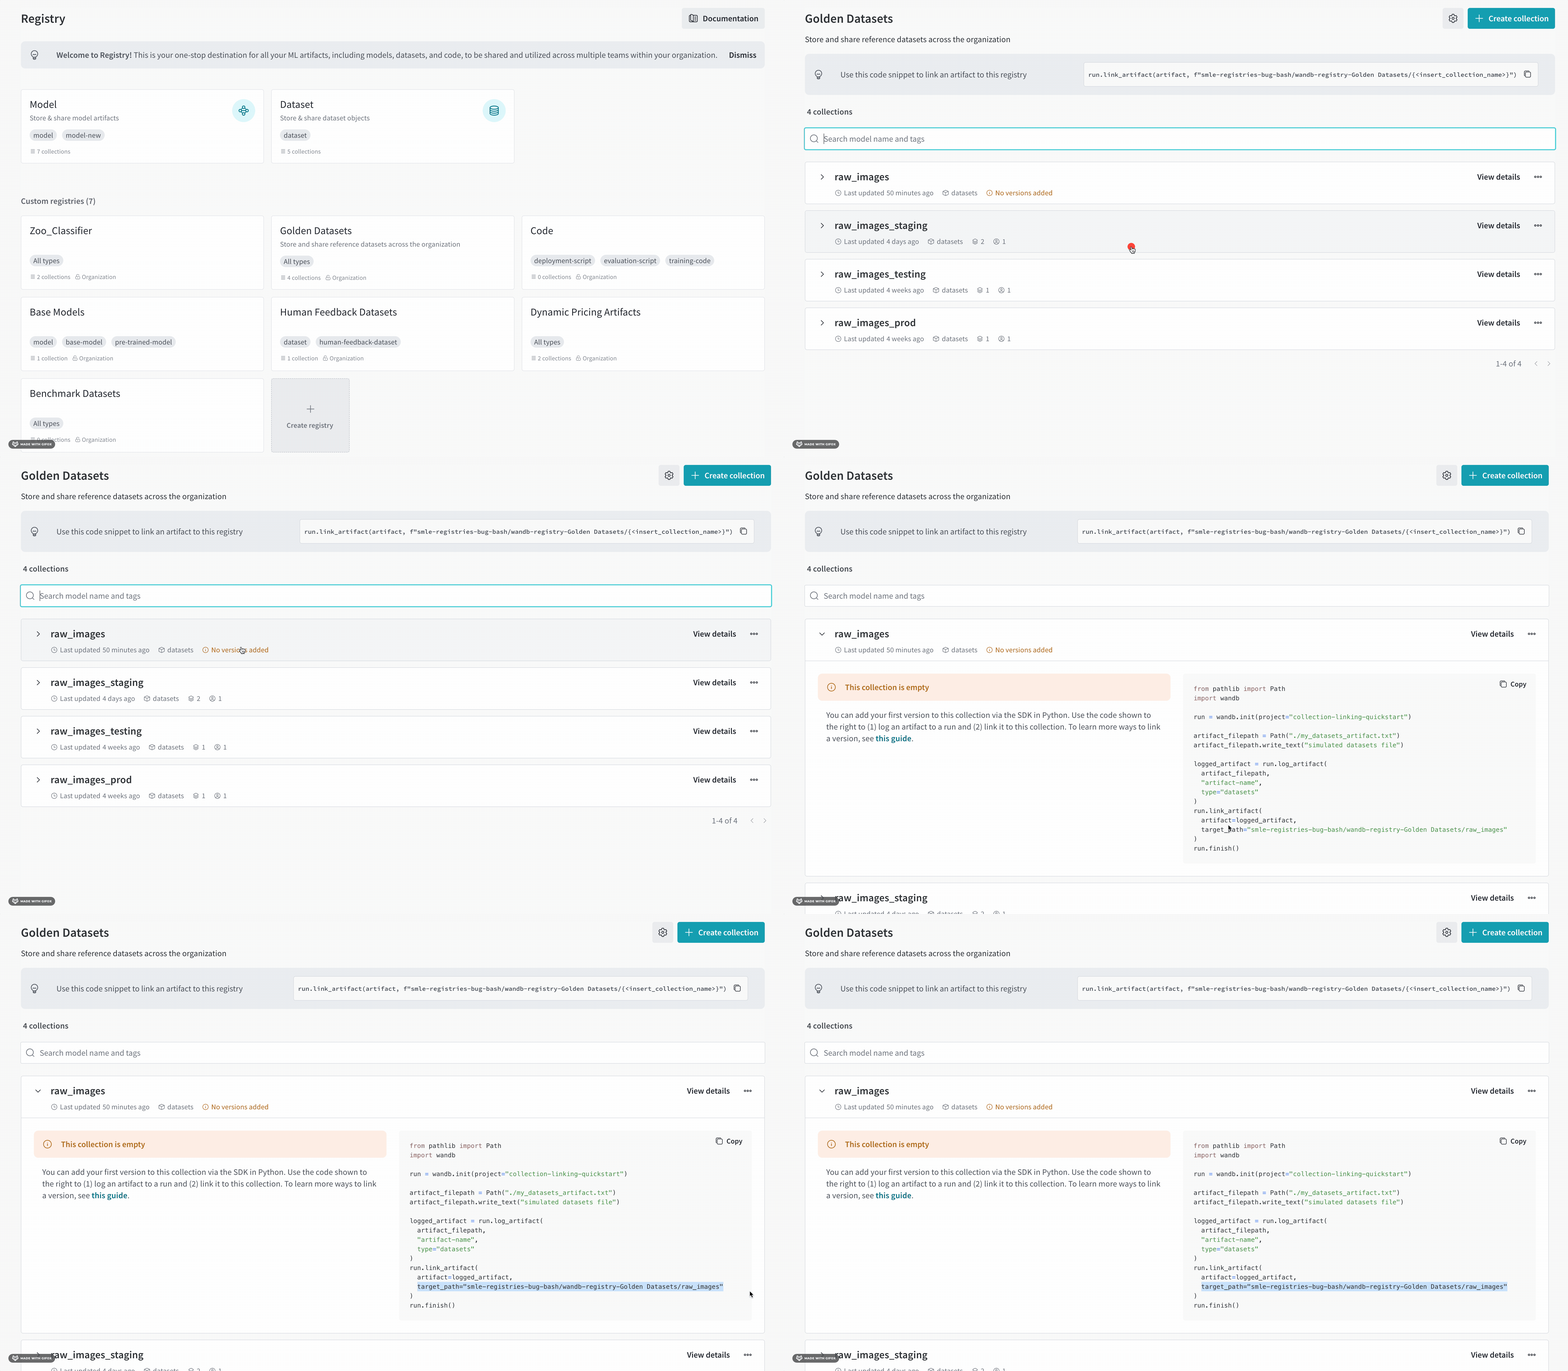 예를 들어, 위 단계를 완료하면 `target_path` 매개변수가 있는 코드 블록을 확인할 수 있습니다:
```python theme={null}
target_path =
"smle-registries-bug-bash/wandb-registry-Golden Datasets/raw_images"
```
이를 컴포넌트로 나누어 보면, 아티팩트를 프로그래밍 방식으로 연결하는 경로를 만드는 데 필요한 항목을 확인할 수 있습니다.
```python theme={null}
ORG_ENTITY_NAME = "smle-registries-bug-bash"
REGISTRY_NAME = "Golden Datasets"
COLLECTION_NAME = "raw_images"
```
임시 컬렉션의 이름을 아티팩트를 연결하려는 컬렉션의 이름으로 바꾸세요.
예를 들어, 위 단계를 완료하면 `target_path` 매개변수가 있는 코드 블록을 확인할 수 있습니다:
```python theme={null}
target_path =
"smle-registries-bug-bash/wandb-registry-Golden Datasets/raw_images"
```
이를 컴포넌트로 나누어 보면, 아티팩트를 프로그래밍 방식으로 연결하는 경로를 만드는 데 필요한 항목을 확인할 수 있습니다.
```python theme={null}
ORG_ENTITY_NAME = "smle-registries-bug-bash"
REGISTRY_NAME = "Golden Datasets"
COLLECTION_NAME = "raw_images"
```
임시 컬렉션의 이름을 아티팩트를 연결하려는 컬렉션의 이름으로 바꾸세요.